

Need help?
Frequently Asked Questions
INSTALLATION & SETUP
Yes — Arranmore ceiling fans can be installed on sloped or vaulted ceilings using the included mounting hardware. However, sloped-ceiling installation is supported only up to a maximum ceiling angle, depending on the model.
Most Arranmore fandeliers are compatible with slopes up to 15.5°, while the standard ceiling fan models can accommodate slopes up to 19°.
For safe installation and optimal airflow, the fan should be mounted with at least 7 feet of clearance from the floor to the bottom of the blades, and at least 18 inches of clearance from any wall.
Yes! In in most cases, you can install an Arranmore ceiling fan in place of an existing light fixture, as long as the electrical box and ceiling structure are suitable for supporting a ceiling fan.
Before installation:
Check the ceiling box: A standard lighting-only electrical box is often not strong enough for a fan’s weight and vibration. Ceiling fans require a fan-rated box or a support brace that’s properly secured to a ceiling joist or beam.
Verify support: If the current box is not fan-rated, you’ll need to replace it with a fan-rated box or install additional support so the fan is safely anchored.
Electrical compatibility: Most ceiling fans are designed to replace a standard junction box for power and control wiring, so the existing wiring can typically be used with the fan’s canopy and canopy screws.
Once the support and wiring are confirmed, the fan can be mounted where the light fixture was, replacing the old fixture with the new ceiling fan.
No — professional installation is not required. Most Arranmore ceiling fans are designed for straightforward installation and can be installed by many homeowners using the included instructions.
If you’re comfortable with basic household wiring and mounting a fixture to a fan-rated ceiling box, you can typically install the fan yourself. The manual does note that if you don’t have enough electrical experience or are unsure about the wiring, it’s always a good idea to consult a licensed electrician for safety.
Professional installation may be helpful in situations like very high or sloped ceilings, replacing a non–fan-rated electrical box, or anytime you want extra peace of mind.
Installing an Arranmore ceiling fan typically requires a few basic tools that most DIYers already have on hand.
According to the manual and standard installation practices, you’ll want the following:
🛠 Basic Tools
Screwdrivers — both flat-head and Phillips
Adjustable wrench or socket set — for securing nuts and bolts
Pliers — needle-nose or standard
Wire cutters / strippers — to trim and prepare electrical wires
Electrical tape — for securing wire connections
📏 Layout & Safety Tools
Tape measure — to confirm clearances and downrod length
Level — to make sure the fan hangs straight
Pencil — for marking mounting points
📌 Installation Support
Ladder or step stool — to reach the ceiling safely
Fan-rated electrical box (existing or new) — a secure ceiling box is required to support your fan
These tools will help with mounting the fan bracket, wiring the fan to your ceiling box, and securing the canopy and blades. Arranmore ceiling fans come with all the necessary screws, hardware, and instructions you need — you just supply the basic tools above.
If you’re missing anything or unsure about electrical work, you can always have a friend help or consult a professional for peace of mind.
1. Make sure the fan direction is set correctly
Fan direction affects airflow depending on the season.
Summer: Run the fan so it pushes air downward for a cooling breeze
Winter: Reverse the motor at low speed to circulate warm air
2. Check installation height and placement
Ceiling fans perform best when they’re installed centered in the room with proper clearance below the blades. Make sure the fan is mounted at least 7 feet above the floor, or closer to 8 feet when possible for the strongest, most comfortable airflow.
3. Consider using a longer downrod (if applicable)
If your ceiling is high, a longer downrod can improve airflow by positioning the fan closer to the living space.
4. Confirm the reverse switch isn’t in neutral
If the reversing switch is stuck in the middle, airflow may be reduced or the fan may not run properly.
Make sure the switch is pushed fully to one side.
Need more help?
If airflow still feels weak after these steps, contact Arranmore Support.
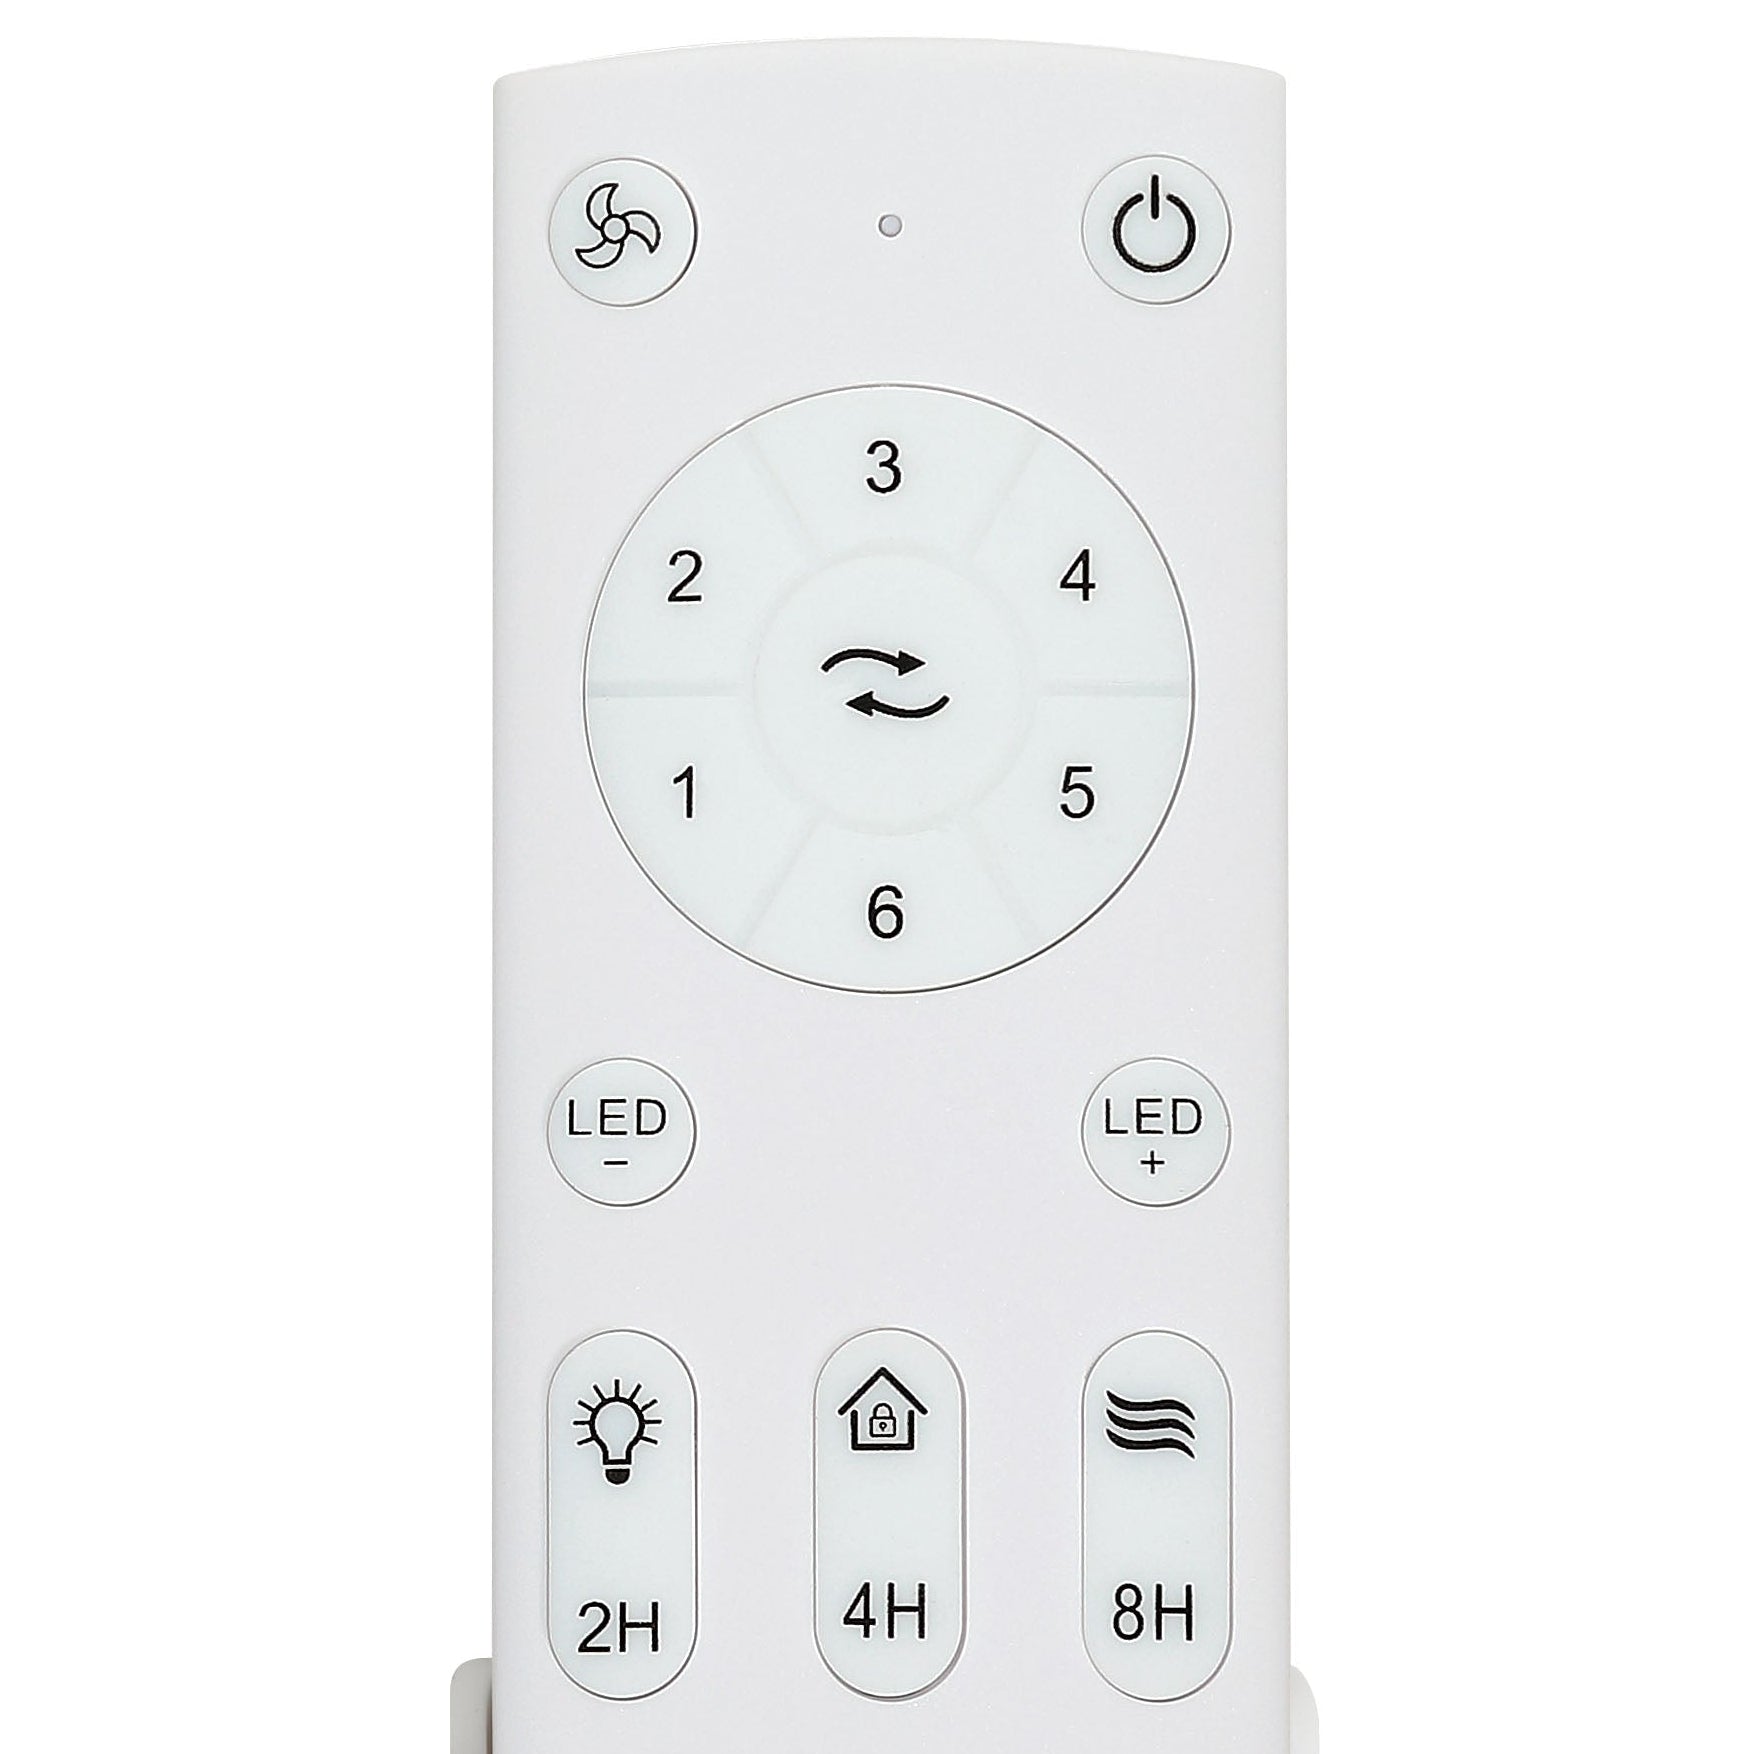
Yes. Arranmore ceiling fans include a handheld remote control for convenient operation of both the fan and light.
The included remote allows you to control:
Fan speed (1–6)
Fan on/off
Light on/off and dimming
Forward/reverse rotation
Sleep timer settings
Natural Breeze and Vacation Mode features
Arranmore ceiling fans are designed to be operated with the included remote control system. Your existing wall switch can still be used to turn power on and off to the fan, but it should remain a simple ON/OFF switch so the remote receiver has constant power.
We do not recommend using dimmer switches or variable speed wall controls, as they can interfere with or damage the remote receiver
Questions About Your Remote?
If you need assistance pairing your remote or ordering a replacement, please contact Arranmore Support and we’ll be happy to help.
Yes — while Arranmore ceiling fans are designed to be operated primarily with the included remote control, you can also add a compatible in-wall control for convenient wall-mounted operation.
Arranmore offers a variety of wall control options for both DC motor and AC motor standard ceiling fans and fandeliers. These controls are designed to work with the fan’s receiver system and provide an alternative to a handheld remote.
Browse our Ceiling Fan Remote Control Collection to see all available wall control and remote options.
Important: Do not install a standard dimmer or variable-speed wall control, as these can interfere with or damage the fan’s remote receiver. Always use an approved Arranmore wall control for safe, reliable performance.
Yes. An optional Arranmore® in-wall remote control is available for all current fandeliers and ceiling fans. It replaces a standard wall switch and provides convenient wall-mounted control of the fan and light, eliminating the need to use the handheld remote for everyday operation.
Browse our Ceiling Fan Remote Control Collection to see all available wall control options.
All current Arranmore® DC motor fandeliers are designed to be operated with the included remote control. A standard wall switch should be used only as a simple ON/OFF power switch.
When power is restored using the wall switch, the fandelier will always default to:
- Light: ON
- Fan: OFF
This behavior is intentional. It allows the room to be illuminated immediately so the handheld remote can be easily located to select the desired fan speed and lighting.
For the best everyday experience, leave the wall switch in the ON position and use the handheld remote for normal operation. When operated using only the remote (without interrupting power at the wall switch), the fandelier will remember its previous fan and light settings.
Yes, in many cases the wall control can be installed in this type of setup. However, because the Arranmore wall control and receiver system are designed to operate from a single wall control location, the second existing wall switch will typically need to be removed or disabled and replaced with a blank wall plate.
The wiring should be reconfigured so the fan receiver receives the proper power feed through the Arranmore wall control. If the home has a 3-way or multi-location switching setup, additional wiring changes may be required. Installation should be performed by a qualified electrician.
Yes. Arranmore ceiling fans and fandeliers can be installed in locations that currently use a 3-way wall switch, such as stairways, hallways, or rooms with multiple switch locations.
However, because Arranmore ceiling fans operate through a remote control receiver installed in the fan, the wall switches cannot control the fan or light functions directly.
How the fan should be wired
The fan must receive constant power from the electrical circuit so the remote receiver can operate properly.
In most installations, this is done by:
• Leaving one of the 3-way switches permanently in the ON position, or
• Having an electrician bypass the 3-way switching so the fan receives uninterrupted power.
Once the fan has constant power, the included remote control will operate all functions.
What the remote control operates
The handheld remote allows you to control:
• Fan speed
• Fan on/off
• Light on/off and dimming
• Forward and reverse rotation
• Additional features such as timers or sleep modes (on DC models)
Important installation notes
• Do not use dimmer switches or variable-speed wall controls, as they can interfere with or damage the remote receiver.
• The fan must be installed on a fan-rated ceiling outlet box capable of supporting a ceiling fan.
Applicable Arranmore models
These installation guidelines apply to all Arranmore DC motor fans, including:
• DC motor fandeliers (such as Auri, Jaxon (excluding the Charred Iron and Textured Black colorways), Kaiti, Santiago, and Maribel).
• DC motor standard ceiling fans (such as Cormac and Ravian).
These guidelines apply to all Arranmore DC motor ceiling fans and fandeliers that operate using the included remote control system.
Still have questions about installation or switch compatibility? Our support team is happy to help—contact us at Arranmore Support and we’ll assist you.
Yes! Arranmore ceiling fans with integrated or optional light kits include dimmable lighting. Brightness can be adjusted using the included remote control.
To ensure compatibility and prevent damage, dimming should always be done through the remote system, as wall dimmer switches are not recommended for Arranmore fans.
Yes! Arranmore ceiling fans differ depending on the lighting system used. Modern ceiling fans like the Cormac and Ravian,feature integrated LED light kits, allow you to adjust the LED color temperature directly with the included remote, cycling through multiple settings from warm white to daylight (2700K–5000K).
In contrast, Arranmore fandeliers use standard replaceable LED bulbs rather than an adjustable LED module. Because of this, fandeliers do not offer remote-controlled warm/cool switching, but you can still customize the light color by choosing bulbs in your preferred color temperature, as long as they meet the fixture’s specifications.
Arranmore ceiling fans do not currently include built-in smart home connectivity, so they cannot be directly connected to Alexa, Google Home, or other smart home apps. These fans are operated using the included remote control system.
If you’d like smart control, one alternative is to use an aftermarket hub such as the Bond Bridge(sold separately). Bond Bridge can allow customers to connect Arranmore fans to their existing smart home system for voice commands and app-based control.

Direct Savings
Save 10% on fans when you shop direct with Arranmore—plus enjoy free shipping on orders $99+.